Before start to install wheel spacers for your ATV/UTV, you should know how to choose the right wheel spacers.
Selecting the correct wheel spacers is crucial for a successful installation. Ensure that the bolt pattern, thread size, spacer thickness, and center bore match your vehicle’s specifications for a perfect fit.
At Hexautoparts, we offer the ideal solution tailored to your ATV or UTV. Our wheel spacers are designed for optimal performance, providing the alignment and stability needed for all your off-road adventures.
Preparation:
Park vehicle on a level surface.
Step 1: Loosen the Lug Nuts
Loosen the lug nuts in a star pattern on both wheels. Do not fully remove them yet.
Step 2: Lift the Vehicle
Use a jack to lift the wheel off the ground, secure with a jack stand.torque settings, ensuring they are secure. Do not use an impact wrench.
Step 3: Remove Wheel
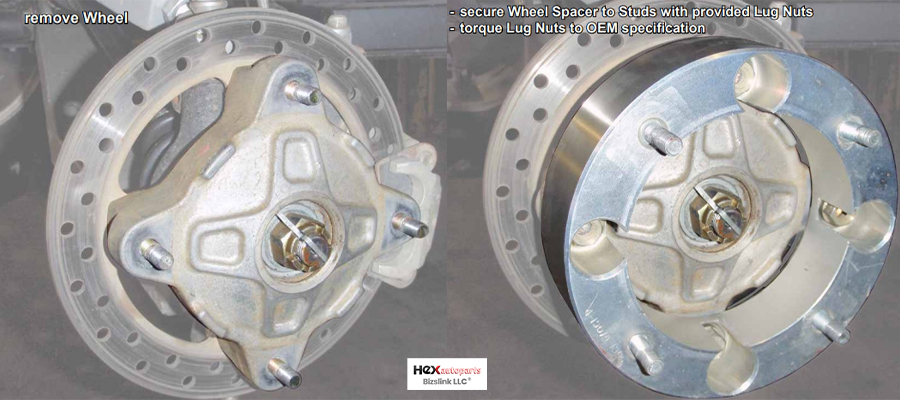
Take off the lug nuts and remove the wheel.
Step 4: Clean Hub
Clean the hub and studs with a wire brush and brake cleaner.
Step 5: Install Wheel Spacers
Place the spacer on the hub, tighten the provided nuts in a star pattern.
Step 6: Torque Lug Nuts
Use a torque wrench to tighten the spacer nuts. Refer to the following torque chart.
Studs Size | Socket | Torque |
M10 | 17mm | 45-55ft/bs |
M12 | 19mm | 70-80ft/bs |
Step 7: Reinstall the Wheels
Place the wheel back on, lightly tighten the lug nuts.
Step 8: Lower Vehicle
Lower the vehicle to the ground.
Step 9: Torque Wheel
Use a torque wrench to tighten the wheel nuts to the manufacturer’s specified torque settings ensuring they are secure. Don’t use an impact wrench.
We highly recommend take the vehicle for a short test drive to check for vibrations or wobbling after installing new wheel spacers. As long as you properly installed and maintained, wheel spacers are safe. They help improve stability and handling by widening the vehicle’s stance, especially useful for off-road conditions. Regular checks to ensure the lug nuts remain tight are essential for safety.
